Wednesday, August 24, 2011

Switching things up for dinner

For some reason or another it is really easy for us to fall into a dinner rut that consists of at least four pasta dishes in a week. Now, I know what you are thinking… an Italian whose go-to easy dish is pasta? Go figure. Anyways, when I bought baby shrimp at the grocery store last Saturday that is exactly how I intended to use them… in some kind of creamy alfredo sauce. But after eating birthday baked ziti two nights in a row, the last thing I wanted for dinner was pasta again and those shrimp needed to be used. Lucky for me I found what looked to be a very interesting recipe from Real Simple (love this website).
Here is the recipe:

Ingredients

  • 1 cup long-grain white rice
  • kosher salt and black pepper
  • slices bacon
  • 1 tablespoon olive oil
  • onion, chopped
  • 1/2 cup dry white wine
  • 3/4 cup heavy cream
  • 1 1/4 pounds large shrimp, peeled and deveined
  • 1 10-ounce package frozen corn

Directions

  1. In a saucepan with a tight-fitting lid, combine the rice, 1 ¼ cups water, and ½ teaspoon salt and bring to a boil. Stir once, cover, and reduce heat to low. Simmer for 18 minutes. (Do not lift the lid or stir!) Remove the rice from heat and let stand, covered, for 5 minutes. Fluff with a fork before serving.
  2. Meanwhile, cook the bacon in a large skillet over medium-high heat until crisp, 5 to 7 minutes. Transfer to a paper towel, let cool, then break into pieces.
  3. Wipe out the skillet and heat the oil over medium-high heat. Add the onion and cook, stirring occasionally, until softened, 4 to 6 minutes.
  4. Add the wine and cook until reduced by half, 2 to 3 minutes. Add the cream and bring to a boil.
  5. Stir in the shrimp, corn, and ¼ teaspoon each salt and pepper. Simmer until cooked through, 4 to 6 minutes. Stir in the bacon and serve over the rice.
Now, of course, me being me, I couldn’t just make the recipe as is… so here is how I changed it:
·         The recipe tells you to cook the bacon, and wipe out the pan before cooking the onions… what person in their right mind would waste all that good bacon grease? So I cooked the onions in it – lots more flavor (and calories).
·         Instead of heavy whipping cream and white wine for the base of the sauce I made a basic roux (but thinner than normal) and added garlic powder, dill seafood seasoning, about ¼ cup feta cheese, and probably a tablespoon or so of white wine (only because the bottle was already open) along with the recommended salt and pepper.
·         I would have added the olive oil, but I forgot it… turned out fine without it.
·         Instead of frozen corn I used canned corn, and instead of long-grain rice, I used short grain sticky rice.
I made steamed broccoli to go with and it all turned out great. Willy and I both really liked it and it really didn’t take too long to make. I think I’m going to keep this one in my back pocket.

Wednesday, August 17, 2011

The Entertainment Factor

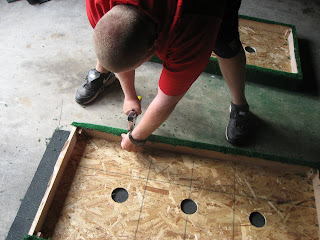
Even CWU grads get to a point in their lives where get-togethers with drinking games as the primary method of entertainment get a little old.  So this summer Willy decided to make our very own set of Washoe Boards. For those of you who don’t know what the heck I’m talking about, here is a link to some background and the general rules. The concept is pretty similar to horseshoes, but we can take it from house to house and not dig holes in the middle of the yard.
There are quite lot of variations to the game, and I’m not quite sure where Willy got the directions he used to build our board but here is what I CAN tell you. He constructed the base of the boards using 1” particle board and cut 3” holes in the center. For the surface of the boards we used green Astroturf – mostly because it is fairly weather resistant. We cut it to size, wrapped it around the bottom and took the staple gun to it. To tell the two teams’ washers apart, we had to spray paint them different colors. So what colors did we choose? Why purple and gold of course (Go Dawgs!)
The game has been a pretty good hit this summer. We played on 4th of July, at our summer BBQ and even brought it camping. I have yet to master an effective toss – the washers just bounce all over when I throw them. Willy is much better at it than I am. Here is a great example of washoes stance demonstrated by Wadz. Just let us know if you want to come over and play!

Tuesday, July 19, 2011

Custom Table Linens

For quite some time I have been looking for table linens to compliment our colorful Fiestaware dishes, but it has been more difficult than you may think. I wanted something colorful and floral but couldn’t find just the right print that didn’t cost more than all of my dishes put together. I finally decided that if I couldn’t find what I was looking for I should just make my own.
Luckily Joann’s had just the perfect indoor décor fabric that would go perfectly with my dishes AND I had a great coupon – 20% off my entire purchase and the fabric was already 30%! Score! Luckily, I had the perfect color thread left over from my outdoor cushion project because I forgot to get some when I was at the store.
After washing, trimming, and ironing my fabric, the sewing was pretty much a breeze. I marked 1” in then folded the fabric over to meet the line I drew giving me ½” to work with, which was plenty. I sewed each side and then folded the seam over and sewed over it again to make sure that the edges don’t fray.
The tablecloth ended up a little shorter than planned after I evened up and trimmed the edges off, but I don’t mind – less chance of me catching the tablecloth on something. After I finished the tablecloth, I decided to make a matching runner for the dresser-turned-sideboard we decided to put up against the adjacent wall.
I have leftover fabric that I’m not really sure what do to with. I may make placemats just as an alternate way to set the table or might make a cushion for the one chair in the set. It might even make a cute cover for a recipe book! Who knows?!

Wednesday, July 13, 2011

Dressed Up Dresser

First, let me apologize for my blogging hiatus. That’s just part of the crazy life of the Garrows I suppose.
Second, take a look at my most recent project…
It’s funny how certain pieces of furniture tend to work themselves through the family. We were recently given a nice 4-drawer dresser by Willy’s mom, Tami. Who knows where life for this dresser began, but after a prolonged stay in Willy’s old room at Tami’s house, then a few years in Katie’s college apartment, it found its way into our home.  I love the shape of this dresser but it was sorely in need of some TLC.   I’ve been wanting to transition our bedroom furniture to white and decided that this would be a great jumping-off point.   With the help of my friend Sydney I chose an antique white by Valspar called Statuesque and decided to change out the retro gold handles for simple Venetian bronze knobs.  The knobs actually match our curtain rods in the bedroom pretty well.  Anyways, after filling the extra holds left by the old handles with wood putty and letting it dry, I sanded down the drawers and the dresser frame. I also had to patch one of the legs that bogey managed to chew when he was a puppy… silly pup. I then used two coats of primer and two coats of paint over the whole thing. Once the paint dried I added the knobs.  
I really wanted something pretty on the inside of the drawers to make this piece extra special… and so began my search for the perfect drawer liner.  I was sorely disappointed with the selections of adhesive-backed shelf liner at the local retailers so I started to think outside the box. After ruling out wrapping paper and wall paper, I settled on fabric for the material to use. I originally wanted something floral and fairly neutral in color, but fell in love with a green and cream zebra print upholstery fabric I found at Joan’s. I used spray glue to affix the fabric to the bottom of the drawers and then trimmed them to size. TIP: If you try this at home, make sure you have a very sharp razor blade at your disposal when trimming the fabric. Using a slightly dull one practically made my head explode.
Now that the dresser is done and in its new home, I love it even more. It looks great and every time I open the drawers the pop of color makes me smile.

Tuesday, May 31, 2011

My spelling in the previous post is really bad.... I apologize

Monday, May 30, 2011

Backyard in Bloom

Things are finally blooming in our backyard... now that it is almost June. Here are some photos of things I've planted, hanging baskets, and even some things I didn't even know were there.

These Fushias and Trailing Petunias are in hanging baskets under the eves of the Gazebo

Last weekened I was browsing the perennials section at Lowes and came across a beautiful Variegated Wallflower. I had heard of a wallflower before, but had never seen one. The different colored blooms and the two-toned striped leaves were so pretty and different from anything else in my garden, I had to buy one. I decided to plant it between the two peonies I had previously planted.

Last year we transplanted a lilac bush that was growing in the middle of the area where we built the dog kennel. It was getting large and we wanted to give the dogs more space. I had heard that lilacs are pretty hearty when transplanted so I was not too concerned about the shrub dying. However, it didn't bloom last year and I was concerned that I may have done something wrong when moviing it. This is why I was so pleased when it popped into full bloom this year. It smells lovely! Take a look...

I was also very suprised by these Lilies of the Valley that I found growing in a corner of the yard. I had no idea what they were until the little white flowers bloomed. They are growing next to one of the paths that the pups use regularly so I am suprised that they have not been thuroughly trampled.

I also thought it would be nice to bring some of the garden into the gazebo, so I planted some white impatiens in planters to complement the decor.


More to come soon I'm sure

Monday, May 16, 2011

Baby Shower Bliss

This Saturday a few friends and I hosted a baby shower for our friend Haley. Since this was just one of a few showers various people were throwing in her honor, we decided it would be fun to do a Nursery-Rhyme/Story-Book theme. The color scheme was lavender and light green - a take on the colors of baby Carlyn's room. We set the theme with the invitation featuring a rhyme about various well-known Mother Goose characters.

Luckily for me I subscribe to Martha Stewart's email newsletters because this month's featured this link about ideas for a Nursery Rhyme themed baby shower. I swear we came up with the idea before I saw this article!
However, I liked a few of the ideas and decided to put my own little spin on them. For example, the story book garland...

Here are the materials I used:

  • Leftover card stock from the invitations
    • 2 pages of white folded inside colored cover to create "books"
  • Ribbon
  • Star Punch
  • Regular hole punch
It was much simpler to just hole punch the books and the stars instead of stapling them together and attaching them to the ribbon with clothespins as the Martha article suggested. I simply strung the books and the stars onto the ribbon to create the garland. The ribbon was also thick enough that the books and stars didn't slide around on them.

Here is what the garland looked like when I was done with it:


We even made a few to put outside on the gazebo:
Another idea of Martha's that I really liked was to give the menu items Nursery-Rhyme themed names. The Mary Quite Contrary Garden Salad, Baker's Man Brownies and Little Boy Blueberry Scones were good ideas,  but who wants to eat Peter Piper Pickled Prawns and Miss Muffet's Lemon Curd? Not this girl. We had actually already chosen a lot of the menu items and just found names to fit. The menu we finally used consisted of the following:

Entrées and Sides
  •  Mary Quite Contrary Garden Salad
  • Jack Sprat Non-Fat Veggie Tray
  • Yankee Doodle Dandy Macaroni Salad
  • Three Blind Mice Cheese and Cold Cuts
  • Chicka Chicka Boom Boom Chips and Dip
  • Man in the Moon Meatballs
Desert
  • Little Boy Blueberry Scones
  • Bakers Man Brownies
  • Hungry Caterpillar Cake Pops
Beverages
  • Peter Piper Sherbet Punch
  • I'm a Little Tea Pot Iced Tea
I even used left-over card stock from the invitations to make name tags to stand in front of each dish. 

Here is what the spread ended up looking like:


Overall I think the shower was a hit. We played four games including a "finish the Nursery Rhyme" fill-in-the-blank type game and a game of guessing flavors of baby food by taste test (yum). It was interesting trying to get everyone to fit in my tiny front room, but nobody seemed to mind. Now we are just all excited for baby Carlyn to arrive. A few more months and she will be here!

Wednesday, May 11, 2011

Adding a little flavor (figuratively and literally) to the garden

Last weekend after the Mother's Day festivities had wrapped up, I decided to make a trip to Freddy's to see if I couldn't find some plants for the yard. I had been wanting a few hydrangeas for a while now and was very pleased to see that they had some! They were a little smaller than I had envisioned, but I decided that they would do. I also decided to buy some peonies for some height in one of my raised flower beds along with a few herbs to try my hand at those.

When I returned home it was about 5:30 and I was determined to get my new plants in the ground before the weather turned. I planted the hydrangeas on either side of the gazebo. I am hoping that they stay a pretty blue color to compliment the new furniture cushions. I am also hoping that I didn't plant them to close to the trees and that they survive. The last one I tried to plant didn't make it.

The peonies were kind of a no-brainer. I think I want to get two more for the other flower bed to match. These are supposed to have a light pink flower, but who knows if those tags they put in the pots are really accurate.

I planted the herbs all together in one of the barrel planters under the window. When the Marigolds from the school arrive, I plan to add some of those to the pot to keep the pests away and add some color. I have never grown any kind of herbs or vegetables outside before so this should be an adventure. I already think that it is going to be too wet outside for the basil. If that's the case I will just have to move it inside.
There is more planting to come I'm sure, we are just waiting for two things to make it happen... good weather and the next paycheck.

Monday, May 9, 2011

Adventures in soup-making

Lately we have gotten tired of the same old meals at home, and thanks to this unseasonably cold spring, I have been inspired to try my hand at making soups. The other night we had a new favorite - Cheese Tortellini and Chicken Soup. The ingredients are basically as follows:

** DISCLAIMER: I rarely actually measure ingredients, so this is what I think I used**
8 cups chicken broth
1 tbsp butter
2 chicken breasts (shredded, cut up and pan fried, however you want it)
1 package frozen Cheese Tortellini (I use the tri-colored ones in the refrigerated section at Costco)
2 cups chopped carrots
2 cups chopped celery
1 chopped yellow onion
1/2 cup chopped parsley
1 to 2 cloves garlic crushed
1 tbsp dried basil (or 3 tbsp fresh chopped basil)
salt and pepper to taste

I add the veggies to the broth first and let them simmer for about 20 to 30 min with the spices before I add the chicken (already cooked). Add the tortellini last and when it is done, the soup is done.

Here is what it looks like:
Sorry the picture isn't that great. I have discovered that taking photos of food is really hard.

Anyways, some of the other soups I have made are Salmon Chowder and Chicken Tortilla soup. So far they have all come out pretty darn good if I do say so myself. Of course Willy like them a lot, but he will eat pretty much anything.

Thursday, May 5, 2011

Proof that I am a spoiled rotten brat

It's really not nice to call someone or something fat, but in the case of my new skis it is a good thing. Last week I received an impromptu phone call from my dad - he was at Sturtevants and wanted to know my height and weight. It turns out that he had found a pair of K2 Got Back skis that were available as demos this season. BUT they had only been skied on ONCE and were now on sale and he bought them for me!! WOO HOO!! I am so very spoiled.

I had been wanting a pair of powder skis ever since our Ski trip at Brundage this year. We were lucky enough to be able to play in the powder all three days we were there. I can ski the powder fine in my regular skis but it takes a fair amount more effort than it would with fat skis. For those of you unfamiliar with the science of skiing, a wider ski underfoot gives the skier more flotation on deep powder which means less likelihood of catching an edge and falling.

Here is a photo of me playing in the powder at Brundage Mountain in March:

So yesterday I came home from work to find a big box at the front door and knew that my new skis had arrived! I immediately took them out of the box and called Dad to let him know. They are in great shape and I am so excited to use them next year!


I can picture myself now skiing through the Meadow on the backside of the mountain in a foot of powder. Don't get me wrong, I love summer and can't wait for it to get here, but this year when the weather turns cold again it will be all the sweeter.

Tuesday, May 3, 2011

A soft (and fashionable) place to land

So as you may or may not know, we have a lovely hand-built gazebo in our back yard. However, for the past three years the structure has mostly gone unused. I would attribute this to not having furniture that we liked or that was comfortable.

In a few weeks I will be hosting a baby shower for a friend and thought how cute it would be if we could use the Gazebo (provided that the weather cooperates of course). Well, this thought then prompted me to think about my Gazebo decor which really left something to be desired. However, upon looking around online for replacement chair and bench cushions I was shocked at how expensive they were! On top of that I could not for the life of me find a pattern that I liked and found that the custom-built benches of the gazebo are a rather odd size . My solution to this problem prompted one of my all-time craftiest projects ever!

Using 2" foam, outdoor canvas, UV resistant thread, ribbon, and Velcro I managed to put together new cushions and cushion covers for our Gazebo. Yay me! My first real sewing project ever has been a success!

On top of sewing the cushions and cushion covers, I decided that the pink metal of our current chair frames had to go. Using Gripper primer and white spray paint, I transformed the frames to a nice clean white which complements my fabric choice very nicely.

Now, for you visual people out there, here are the before and after shots!


Now I am thinking about other ways to update the Gazebo and make it a place I want to be on a nice summer day. This may include planters, candle holders, and perhaps even a paper lantern hanging from the top! I will post pictures when the whole thing is complete!

Welcome!

Welcome to our blog! If you happen to be wondering what the Garrows have been up to lately this is the place for you! This is my first attempt at blogging so hang with me while I figure this whole thing out. I hope to post about everything from projects we are working on to new recipes we like, to what the infamous Buck and Bogey are up to and more.